 Loading... Please wait...
Shop all Stores

Keystone (Lifecore) Dental Compatible Restore Systems Regular Diameter Simple Step Abutments With Titanium Screw (T-4ESA-LC)

Product Description
Titan Implants Exclusive Product:
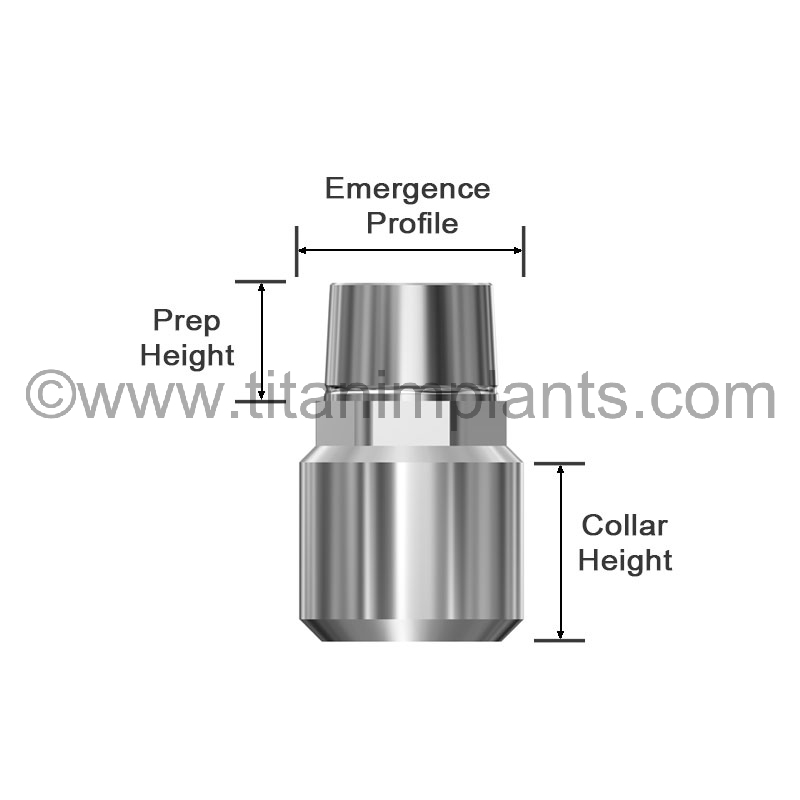
The Titan Design Simple Step Abutment has more features than the regular straight prefabricated abutment. It has a hex instead of a flat side for better crown retention and is available in prep heights of 4, 5.5, and 7mm whereas a stock straight abutment is only available in 8mm prep height. In addition to three different prep heights, it comes in different emergence profiles and various collar heights 1 through 4mm.
Available in:
- 3 Different Prep Heights
- Various Collar Heights
- Comes with Free Titanium Abutment Screw (0.050'') hex drive
Instruction Videos how to use the Simple Step Abutment:
Video# 1.How to Place Biomet 3i External Hex Simple Step Abutment Closed Tray Impression Technique
Recommended Accessory:
Titan abutments are highly recommended to use with the Titan Implant Locator Pin:
![]()
Titan Implants’ Implant Locator Pin is a straight threaded pin with a serrated handle designed for several practical uses:
At times, it may be difficult to insert an impression coping or abutment intraorally due to impaired visibility or access. The implant locator is easier to screw into the implant. Once inserted, by hand, the impression coping or abutment will slide over the pin and lock in place because of the snug fit of the head. Then the implant locator pin is removed and replaced by the appropriate screw.
The implant locator pin can be used to check for parallelism and positioning of the implants intraorally. This can be done in the lab too. The implant locator pin can be placed in the analog or fixture. In the lab, the implant locator pin is convenient for custom abutment fabrication. Simply slide the plastic sleeve down the implant locator pin and proceed to wax-up to the appropriate gingival height. The ease of sliding the abutment on and off saves time and simplifies lab work. (This can be actually done in the mouth)
The implant locator pin comes in three different lengths and different threads to match various manufacturers.
Corresponding Implant Locator Pin for Lifecore External Hex 4.1mm Platform implant: M2-ILP-20
Choosing Proper Abutment Diameters for the Titan Simple Step Abutment
Available for the External Hex 4.1mm and 5.0mm Platform Diameter
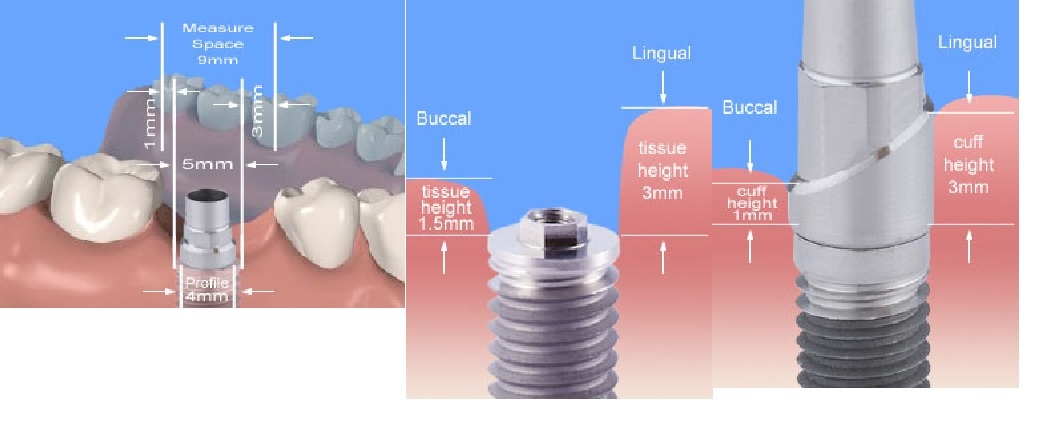
Measure the available space between the proximal surfaces of the teeth adjacent to the edentulous area.
Subtract two millimeters since it is necessary to have at least one millimeter between the abutment flare and the adjacent root surface. This will give you the maximum abutment diameter for the available space.
If more than 1mm is available on each side choose a larger Emergence Profile diameter. There are three levels of Emergence profile diameters for each abutment system: level 1 (Emergence Profile), level 2, and level 3. (See the chart)
Choosing Proper Abutment Preparation Height
Measure the space between the gingival crest and the opposing tooth. Subtract three millimeters.
This will give you the proper abutment height.
Measure the distance between the implant platform and the crest of the gingival on the lingual and the buccal. Choose the highest number. Note: Usually the buccal is the
highest number. Subtract ½ or 1mm from this number. This will ensure that the collar is slightly below the crest of the gingiva. Choose the closest collar height from the chart.
If the collar height is different between the buccal and lingual and you wish to follow the contour of the gingiva, modify the collar appropriately.
TIP: The best results are obtained taking a tissue model impression of the implant using a transfer coping. The lab can then easily choose and modify the proper abutment for the available space.
Choosing the Proper Collar Height
Measure the distance between the implant platform and the crest of the gingival on the lingual and the buccal. Choose the highest number. Note: Usually the buccal is the highest number. Subtract ½ or 1mm from this number. This will ensure that the collar is slightly below the crest of the gingiva. Choose the closest collar height from the chart.
If the collar height is different between the buccal and lingual and you wish to follow the contour of the gingiva, modify the collar appropriately.
TIP: The best results are obtained taking a tissue model impression of the implant using a transfer coping. The lab can then easily choose and modify the proper abutment for the available space.
Add to Wish List
You Recently Viewed...
|
Note: All pictures are not sized to scale. All prices are in USD. All prices and product availability subject to change without prior notice. Titan Implants® is a trademark of Titan Implants, Inc., | ||||||
|
Branemark System®, MirusCone™ and EsthetiCone®, Sterioss®, Nobel Active®, and NobelReplace®, Tapered and Straight Groovy, Nobel Speedy®, Replace™, Replace Select™ Tapered and Straight, Sterioss™, HL Series, Flat Top, Replace™ External Hex, Unigrip, WP, and RP are registered trademarks of Nobel Biocare. 3i®, Biomet®, Biomet 3i™, Certain®, Miniplant®, NanoTite™, Osseotite®, Osseotite XP® and Prevail®, MicroMiniplant®, and Immediate Occlusal Loading® are trademarks of Biomet 3i, Inc. 3i TG® is a registered trademark of 3i Implant Innovations Inc. Frialit-2®, XIVE®, and Friadent® are registered trademarks of Dentsply Friadent Group. OTI Systems® is a registered trademark of Osteo- Implant Corporation. Micro-Lok® and Silhouette Laser-Lok® are registered trademarks of Bio-Lok International Inc. IMTEC®, Endure® and Universal® Implants are registered trademarks of Imtec 3M Corporation. Lifecore® is a registered trademark of Lifecore Biomedical Group. Lifecore®, RESTORE, SD, RD, WD, Renova®, SDI, WDI, Stage-1, RDS, and WDS are registered trademarks of Keystone Dental. Solid Abutment, SCS, and SynOcta® are registered trademarks of ITI-Straumann®. Screw-Vent®, Tapered Screw-Vent®, Spectra Cone®, Tapered Collar®, Advent®, Taper-Lock®, SwissPlus®, and Micro-Vent™, Bio-Vent®, Core-Vent®, Spectra Cone®,(The Spectra System®) are registered trademarks of Paragon Dental. Paragon®, Screw-Vent®, Tapered Screw-Vent®, Advent®, SwissPlus®, and Spline® Implants are registered trademarks of Zimmer Dental. One Stage®, and Endopore ® are registered trademarks of Innova Corporation. BioHorizons™ is a trademark of BioHorizons USA Implant Systems Inc. Sterioss, HL Series, Flat Top, Replace, Replace-Select, are registered trademarks of Nobel Biocare AB. IMZ® is a registered trademarks of FRIATEC systems. MicroThread™ and Conical Seal Design™ are registered trademarks of Astra-Tech Dental. Astra Tech Inc. is a registered trademark of DENTSPLY Implants. Bicon™ is a registered trademark of Bicon Dental Inc. INTEGRAL® and OMNILOC® are registered trademarks of Calcitek®. Spiralite® and Bonelock® Implants, Rootform® Flat Top Abutments and Hex-Top Abutments are registered trademarks of Swiss Implants Inc. Sterngold-ImplaMed® is a trademark of Sterngold Dental, LLC. American Dental Implant is a trademark of American Dental Implant Corporation. |
||||||
| Contact Us at : 1-201-439-0470 Or call us at : 201-439-0026 Customer service hours 8:30am - 6:00pm EST, Monday through Friday (Our clients are dentists and lab technicians. We do not work with patients.) |
||||||
We ship by  |
We Accept  |
|||||
Copyright 2026 Titan Implants, Inc. - All rights reserved.